User Management & Role-Based Access Control (RBAC)
GraphnAI Platform uses a deny-by-default access control model. Users must be explicitly authorized before they can log in, either individually or through Entra ID group membership.
Roles
GraphnAI defines three roles in a strict hierarchy. Each higher role inherits all permissions from the roles below it.
| Role | Level | Description |
|---|---|---|
| ADMIN | Highest | Full platform access including user management, bridge provisioning, and remediation |
| OPERATOR | Mid | Analysis, simulation, bridge monitoring, and sync operations |
| VIEWER | Base | Read-only access to graph topology and search |
IMPORTANT
A user with no role (NONE) is denied login entirely. There is no anonymous or unauthenticated access to any data endpoint.
Permission Matrix
UI Visibility
| Feature | VIEWER | OPERATOR | ADMIN |
|---|---|---|---|
| Graph Explorer & Search | ✅ | ✅ | ✅ |
| View Menu (Orphans, Edge Labels, etc.) | ✅ | ✅ | ✅ |
| Graph Legend | ✅ | ✅ | ✅ |
| Node Detail Panel | ✅ | ✅ | ✅ |
| Critical Junctions Panel | ❌ | ✅ | ✅ |
| Simulation & Remediation Actions | ❌ | ✅ | ✅ |
| Criticality Override Controls | ❌ | ✅ | ✅ |
| Clear All Simulations Button | ❌ | ✅ | ✅ |
| Settings Gear Icon | ❌ | ✅ | ✅ |
| Bridge Configuration Page | ❌ | ✅ | ✅ |
| User Management Page | ❌ | ❌ | ✅ |
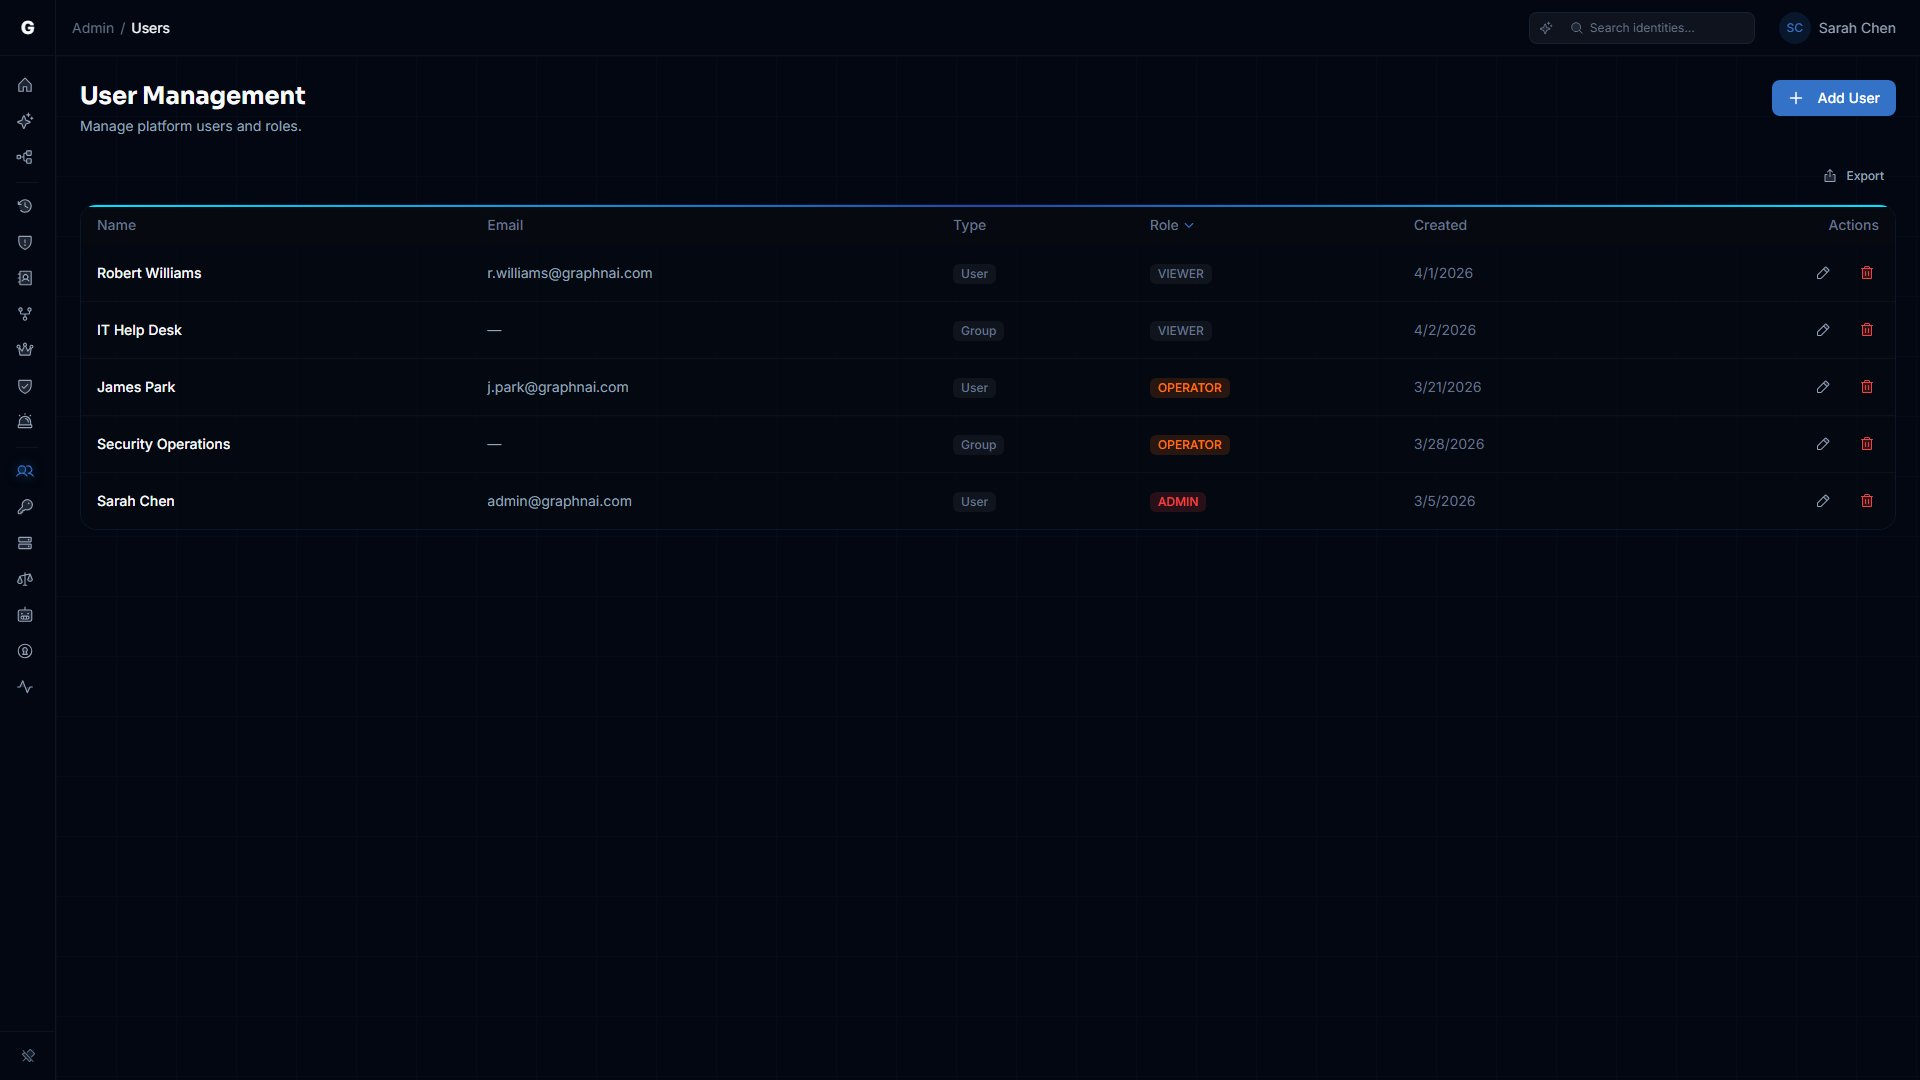
Adding Users
Prerequisites
- You must be logged in as an ADMIN
- Graph API permissions must be configured (see Entra ID Setup Guide)
Adding Individual Users
- Navigate to Admin > Users in the sidebar
- Click the Add User button
- Select the type: User or Group
- Enter the user's name and email (or group name and identifier)
- Select a Role from the dropdown (VIEWER, OPERATOR, or ADMIN)
- Click Add
The user can now log in to GraphnAI with the assigned role.
Adding Groups
Instead of adding users individually, you can authorize an entire Entra ID security group. All members of that group will inherit the assigned role.
- Navigate to Admin > User Management in the sidebar
- Switch the search toggle to Groups
- Search for and select the group
- Select a Role — all group members will receive this role at login
- Click Add Authorization
TIP
Group-based authorization is recommended for managing access at scale. Users who are members of an authorized group don't need individual authorization entries.
Authorization Priority
When a user logs in, GraphnAI checks authorization in this order:
- Direct user authorization — If the user's Entra Object ID matches a user entry, that role is used
- Group authorization — If no direct entry exists, the user's Entra group memberships are checked against authorized groups. The highest-role group match wins
- Seed admin — On first login only, the email matching
GRAPHNAI_SEED_ADMIN_EMAILis auto-registered as ADMIN - Deny — If none of the above match, login is rejected
Modifying Roles
- In the User Management table, find the user or group
- Click the current role badge to enter edit mode
- Select the new role from the dropdown
- Click the checkmark to save
Removing Access
- In the User Management table, find the user or group
- Click the trash icon on their row
- Confirm the deletion
CAUTION
You cannot remove your own authorization. This prevents admins from accidentally locking themselves out.
Identity Mapping
GraphnAI uses the Entra ID Object ID (oid claim) as the canonical user identifier rather than the OIDC sub claim. This is because:
- The
subclaim is pairwise — unique per application, so it doesn't match across Graph API and OIDC tokens - The
oidclaim is the tenant-wide Object ID — the same value returned by Microsoft Graph API when searching for users
This means when an admin adds a user via the IdP search (which uses Graph API), the stored identifier will correctly match when that user logs in via OIDC.
Security Notes
- Backend enforcement: All role checks are enforced by server-side middleware. Frontend UI hiding is a convenience, not a security boundary.
- CSRF protection: The OIDC login flow uses a cryptographic random
stateparameter validated viaHttpOnlycookies. - Session tokens: JWTs include standard claims (
iat,nbf,jti) and are signed with HMAC-SHA256. - Email verification: Login is rejected only when the IdP explicitly marks
email_verifiedasfalse(e.g., unverified guest accounts). Entra ID managed accounts omit this claim entirely, which is treated as acceptable.