Identity Bridge
Connect GraphnAI to your on-premises Active Directory without opening inbound firewall ports.
Requires role: Admin (provisioning and configuration), Operator (monitoring and sync)
Related: Bridge Configuration, Domain Auto-Discovery, Hardware Sizing, User Management & RBAC
Overview
The Identity Bridge is a containerized agent that runs inside your network and collects identity data from Active Directory. It connects outbound to the GraphnAI cloud platform over an encrypted, mutually authenticated channel — no inbound firewall rules or VPN tunnels are required.
Once connected, the Bridge continuously syncs user accounts, groups, computers, organizational units, security permissions, and Group Policy data into the identity graph. This data forms the Theoretical and Constrained fidelity layers that power the platform's risk analysis features. The Bridge also executes remediation actions (such as disabling a user or removing a group membership) dispatched from the platform, with built-in safety checks to prevent unintended changes.
The Bridge is stateless from a firewall perspective. It opens one outbound WebSocket connection to the platform server and sends a heartbeat every 30 seconds. If the connection drops, it automatically reconnects on the next heartbeat cycle.
Prerequisites
- Admin role on the GraphnAI platform to provision the Bridge
- Docker (recommended) or a Linux/Windows host to run the Bridge binary (2-4 GB RAM, 2-4 CPU cores — see Hardware Sizing)
- Active Directory service account with read access to the directory (see Service Account Requirements below)
- Network path from the Bridge host to your Domain Controllers on port 636 (LDAPS) or 389 (LDAP)
- Network path from the Bridge host to the GraphnAI platform server on port 8443 (outbound only)
Service Account Requirements
The service account used by the Bridge to read Active Directory must have:
- Read access to all identity objects (users, groups, computers, OUs, containers)
- Read access to the
nTSecurityDescriptorattribute on all objects (required for permission analysis) - Access to the SYSVOL share for GPO collection (standard domain member access is sufficient)
- No write permissions are needed unless you plan to use remediation actions
A standard domain user account with the "Read all properties" right delegated at the domain root is sufficient for most environments. Avoid using Domain Admin or other privileged accounts as the service account.
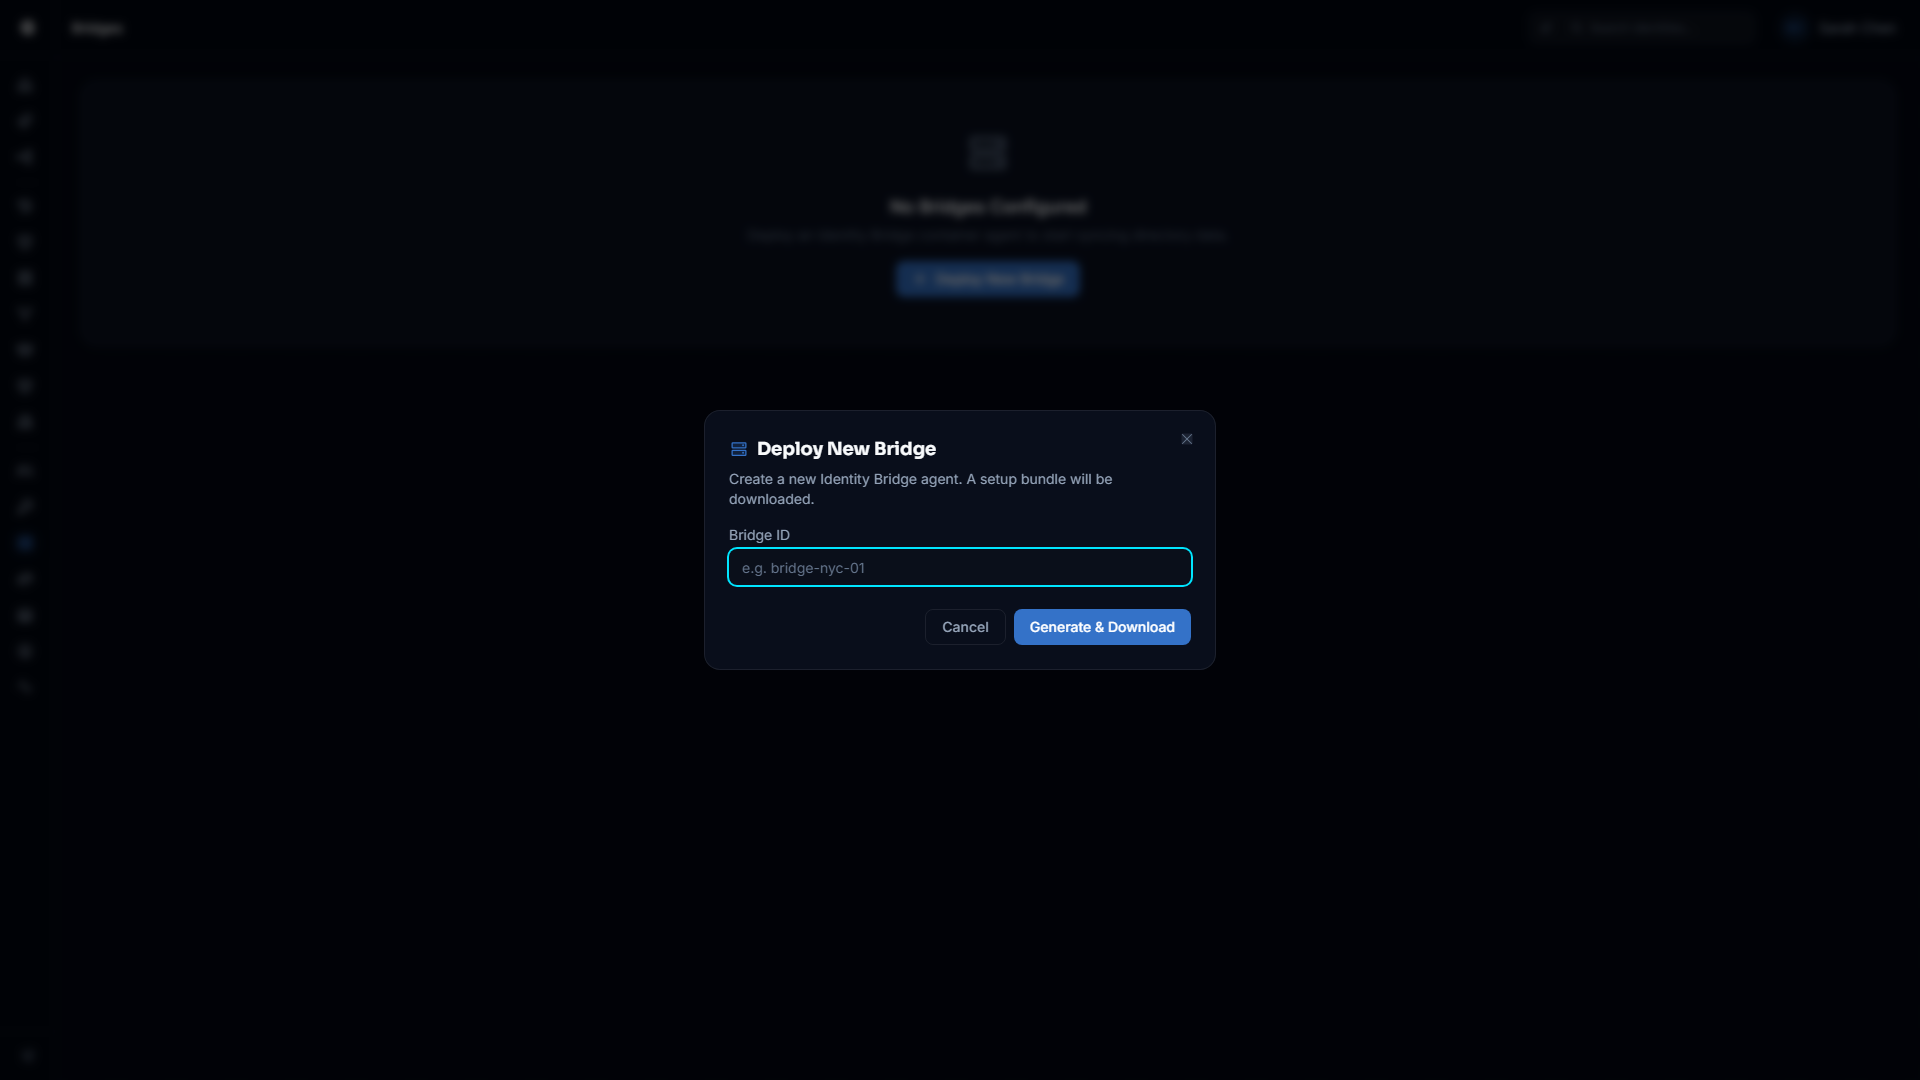
Provisioning a Bridge
Bridge provisioning generates a unique identity for the agent and creates the certificates it uses to authenticate to the platform. This is a one-time operation per Bridge instance.
Requires Admin role.
- Log in to GraphnAI Platform with an Admin account
- Navigate to Bridges in the sidebar
- Click Add Bridge
- Enter a descriptive name for the Bridge (e.g.,
prod-corp-dc01,us-east-bridge)- This name becomes the Bridge ID and cannot be changed after provisioning
- Click Generate Bundle
- A ZIP file downloads to your machine containing:
cert.pem— the Bridge's client certificatekey.pem— the Bridge's private keyca.crt— the platform's root CA certificate (used to verify the server)docker-compose.yml— a ready-to-use Docker Compose fileconfig.yaml— reference configurationREADME.md— quick-start instructions
IMPORTANT
Download and store the ZIP bundle securely. The private key (key.pem) is generated once and cannot be retrieved again. If it is lost, you must delete the Bridge and provision a new one.
Deployment
Option A: Docker (Recommended)
The Docker deployment is the simplest and most portable option. The generated docker-compose.yml includes all required environment variables pre-filled with your Bridge ID and server URL.
- Transfer the downloaded ZIP bundle to the host that will run the Bridge
- Extract the ZIP into a directory (e.g.,
/opt/graphnai-bridge/) - Start the Bridge:
bash
cd /opt/graphnai-bridge
docker compose up -d- Verify the Bridge is running and has connected:
bash
docker compose logs -fLook for a log line similar to:
{"level":"INFO","msg":"Connected to Cloud C2"}
{"level":"INFO","msg":"Bridge connected","id":"your-bridge-id"}
Within 30 seconds, the Bridge will appear as Connected in the GraphnAI platform under Bridges in the sidebar.
Persisting State Across Restarts
The Bridge saves sync progress to state.json in its working directory. This file records the last sync position (USN watermark) for each domain so that after a container restart, the Bridge resumes with a delta sync rather than a full re-sync.
To persist state.json across container restarts, add a volume mount to the docker-compose.yml:
yaml
volumes:
  - ./cert.pem:/app/cert.pem:ro
  - ./key.pem:/app/key.pem:ro
  - ./ca.crt:/app/ca.crt:ro
  - ./data:/app/data        # Persists state.json and trusted_cas.pem
Option B: Standalone Binary
For environments where Docker is not available, run the Bridge binary directly.
- Download the
graphnai-bridgebinary for your platform from the releases page - Place the
cert.pem,key.pem, andca.crtfiles in the same directory as the binary - Set the required configuration (Bridge ID and server URL) as provided in the generated bundle
- Run the binary:
bash
./graphnai-bridgeFor production deployments, configure the binary as a system service (systemd on Linux, NSSM or Task Scheduler on Windows) so it restarts automatically.
Configuration
The Bridge requires a Bridge ID and the platform server URL, both of which are pre-configured in the generated deployment bundle. Certificate files (cert.pem, key.pem, ca.crt) must be present in the working directory or at the paths specified in the bundle configuration.
Required Settings
| Setting | Description | Example |
|---|---|---|
| Bridge ID | Unique identifier for this Bridge instance. Set automatically in the generated docker-compose.yml. | prod-corp-dc01 |
| Cloud URL | URL of the GraphnAI platform server. Set automatically in the generated bundle. | wss://graphnai.example.com:8443 |
Certificate Files (mTLS)
| File | Default | Description |
|---|---|---|
| Bridge certificate | cert.pem | Path to the Bridge's client certificate |
| Bridge private key | key.pem | Path to the Bridge's private key |
| Platform CA certificate | ca.crt | Path to the platform root CA certificate used to verify the server |
Safety and Security Options
| Setting | Default | Description |
|---|---|---|
| Read-Only Mode | false | When enabled, all remediation instructions are acknowledged but not executed. No LDAP writes will occur. |
| Insecure LDAP | false | When enabled, allows unencrypted LDAP connections on port 389. For lab use only. |
| Trust Store Path | trusted_cas.pem | Path to a file where custom trusted CA certificates are stored (used for LDAPS with custom enterprise CAs). |
Legacy Single-Domain Settings
The following settings configure a single-domain fallback for standalone or development use. In production, domain configuration is pushed from the platform UI after the Bridge connects (see Configuring Domains). These settings are optional when using the platform-managed configuration.
| Setting | Description | Example |
|---|---|---|
| LDAP URL | LDAP URL for the Domain Controller | ldaps://dc01.corp.local:636 |
| Bind DN | Service account distinguished name or UPN | CN=svc-graphnai,OU=Service Accounts,DC=corp,DC=local |
| Bind Password | Service account password (use file-based secrets in production) | — |
| Base DN | Base distinguished name for directory searches | DC=corp,DC=local |
Docker Secrets (File-Based Secrets)
Any configuration value that holds a secret (such as the LDAP service account password) supports loading from a file. Instead of placing the secret value directly in the environment, point to a file containing the secret value. This is the recommended approach for Docker Secrets and Kubernetes secrets.
Example Docker Compose snippet:
yaml
environment:
  - LDAP_BIND_PASSWORD_FILE=/run/secrets/ldap_password
secrets:
  - ldap_password
The Bridge reads the file content at startup and strips any trailing whitespace.
mTLS Certificate Setup
The Bridge authenticates to the GraphnAI platform using mutual TLS (mTLS). Both the server and the Bridge present certificates that are verified against the platform's internal certificate authority.
The generated ZIP bundle contains all the necessary certificate files. No manual certificate creation is required for standard deployments.
What Each File Does
| File | Purpose |
|---|---|
cert.pem | The Bridge's identity certificate, signed by the platform CA. Identifies this specific Bridge instance. |
key.pem | The private key paired with cert.pem. Keep this file secret — it proves the Bridge is who it claims to be. |
ca.crt | The platform's root CA certificate. The Bridge uses this to verify that it is connecting to the legitimate GraphnAI server. |
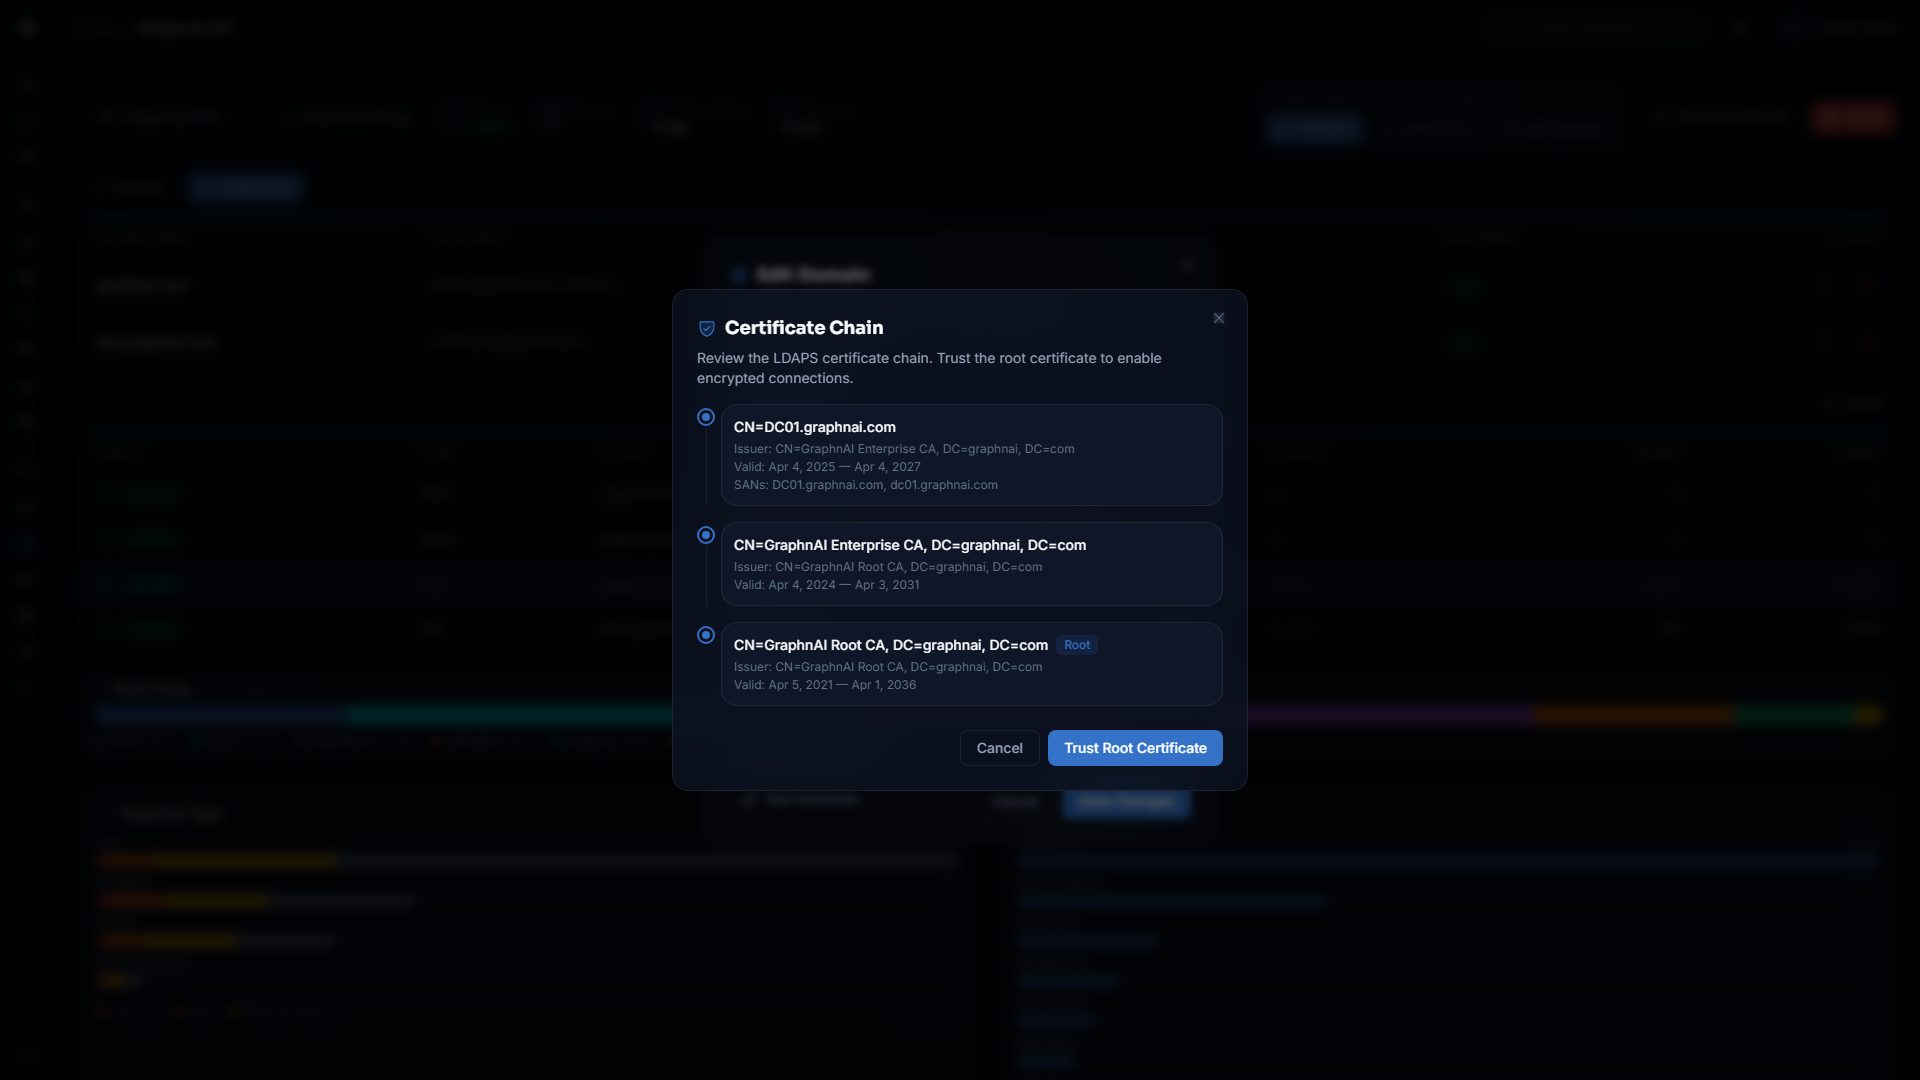
Trusting Custom Enterprise CAs (for LDAPS)
If your Domain Controllers use LDAPS certificates signed by an internal enterprise CA, the Bridge needs to trust that CA to make encrypted LDAP connections. Use the certificate trust workflow in the platform UI:
- Navigate to the Bridge detail page, then click "Edit" on a domain and "Test Connection"
- Click Fetch Certificate and enter the hostname and port of your Domain Controller (e.g.,
dc01.corp.local:636) - The Bridge retrieves the certificate chain from the Domain Controller
- Review the certificate details and click Trust This Certificate
- The certificate is added to the Bridge's local trust store (
trusted_cas.pem) and all future LDAPS connections will succeed
Alternatively, if you already have the CA certificate in PEM format, you can mount it as an additional volume and reference it in the trust store path setting.
Configuring Domains
For comprehensive domain configuration instructions — including credential management, sync scheduling, certificate trust, and troubleshooting — see the Bridge Configuration guide. For automatic domain controller discovery, see Domain Auto-Discovery.
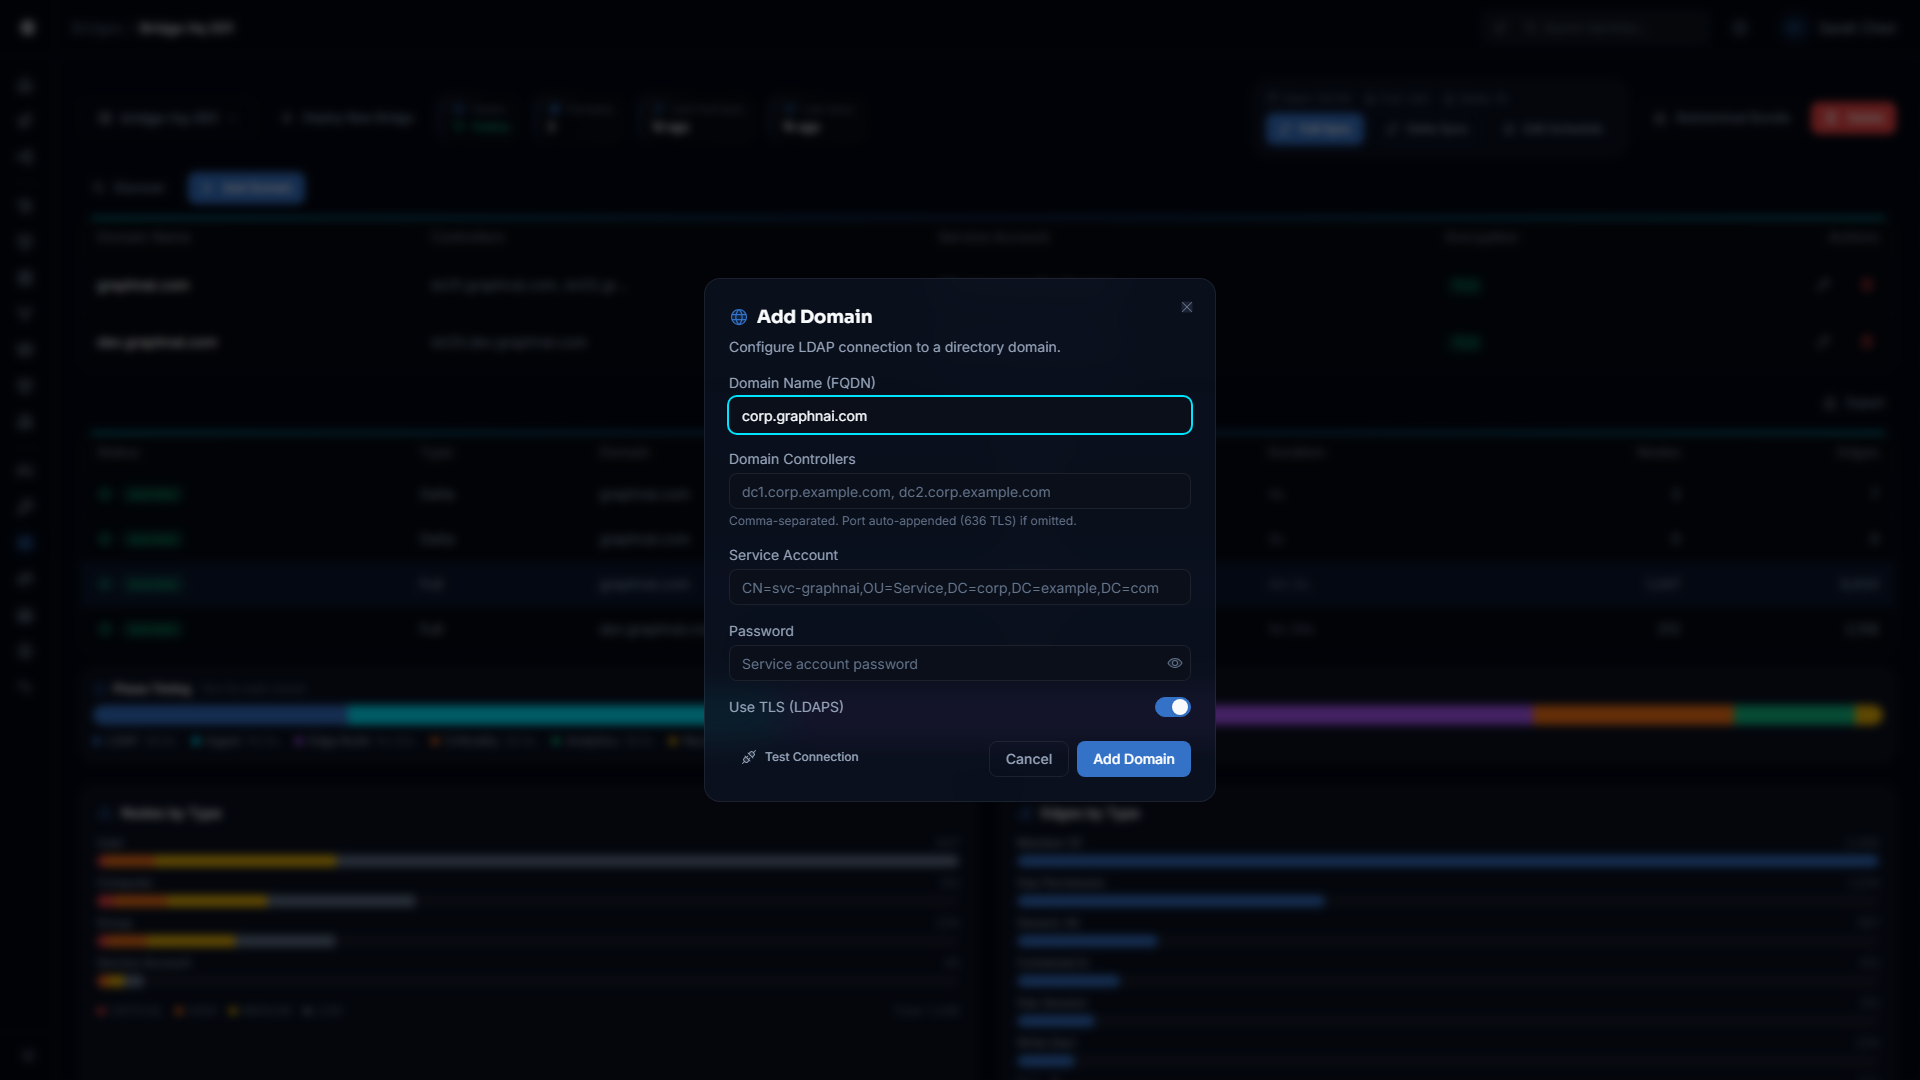
After the Bridge connects, configure which Active Directory domains to collect from. Domain configuration is managed from the platform UI and pushed to the Bridge automatically — no Bridge restart is required.
Requires Admin role.
- Navigate to the Bridge detail page
- Click Add Domain
- Fill in the domain details:
- Domain Name: The FQDN of the domain (e.g.,
corp.local) - Domain Controllers: One or more controller URLs (e.g.,
ldaps://dc01.corp.local:636) - Service User: The service account UPN or distinguished name (e.g.,
[email protected]) - Password: The service account password
- Use TLS: Enable for LDAPS connections (strongly recommended)
- Domain Name: The FQDN of the domain (e.g.,
- Click Test Connection to verify the Bridge can reach the Domain Controller and bind with the provided credentials before saving
- Click Save
The platform encrypts the password and pushes the configuration to the Bridge over the existing WebSocket connection. The Bridge validates the connection to each domain before applying the new configuration — if any domain fails validation, the entire configuration update is rejected and the previous configuration remains active.
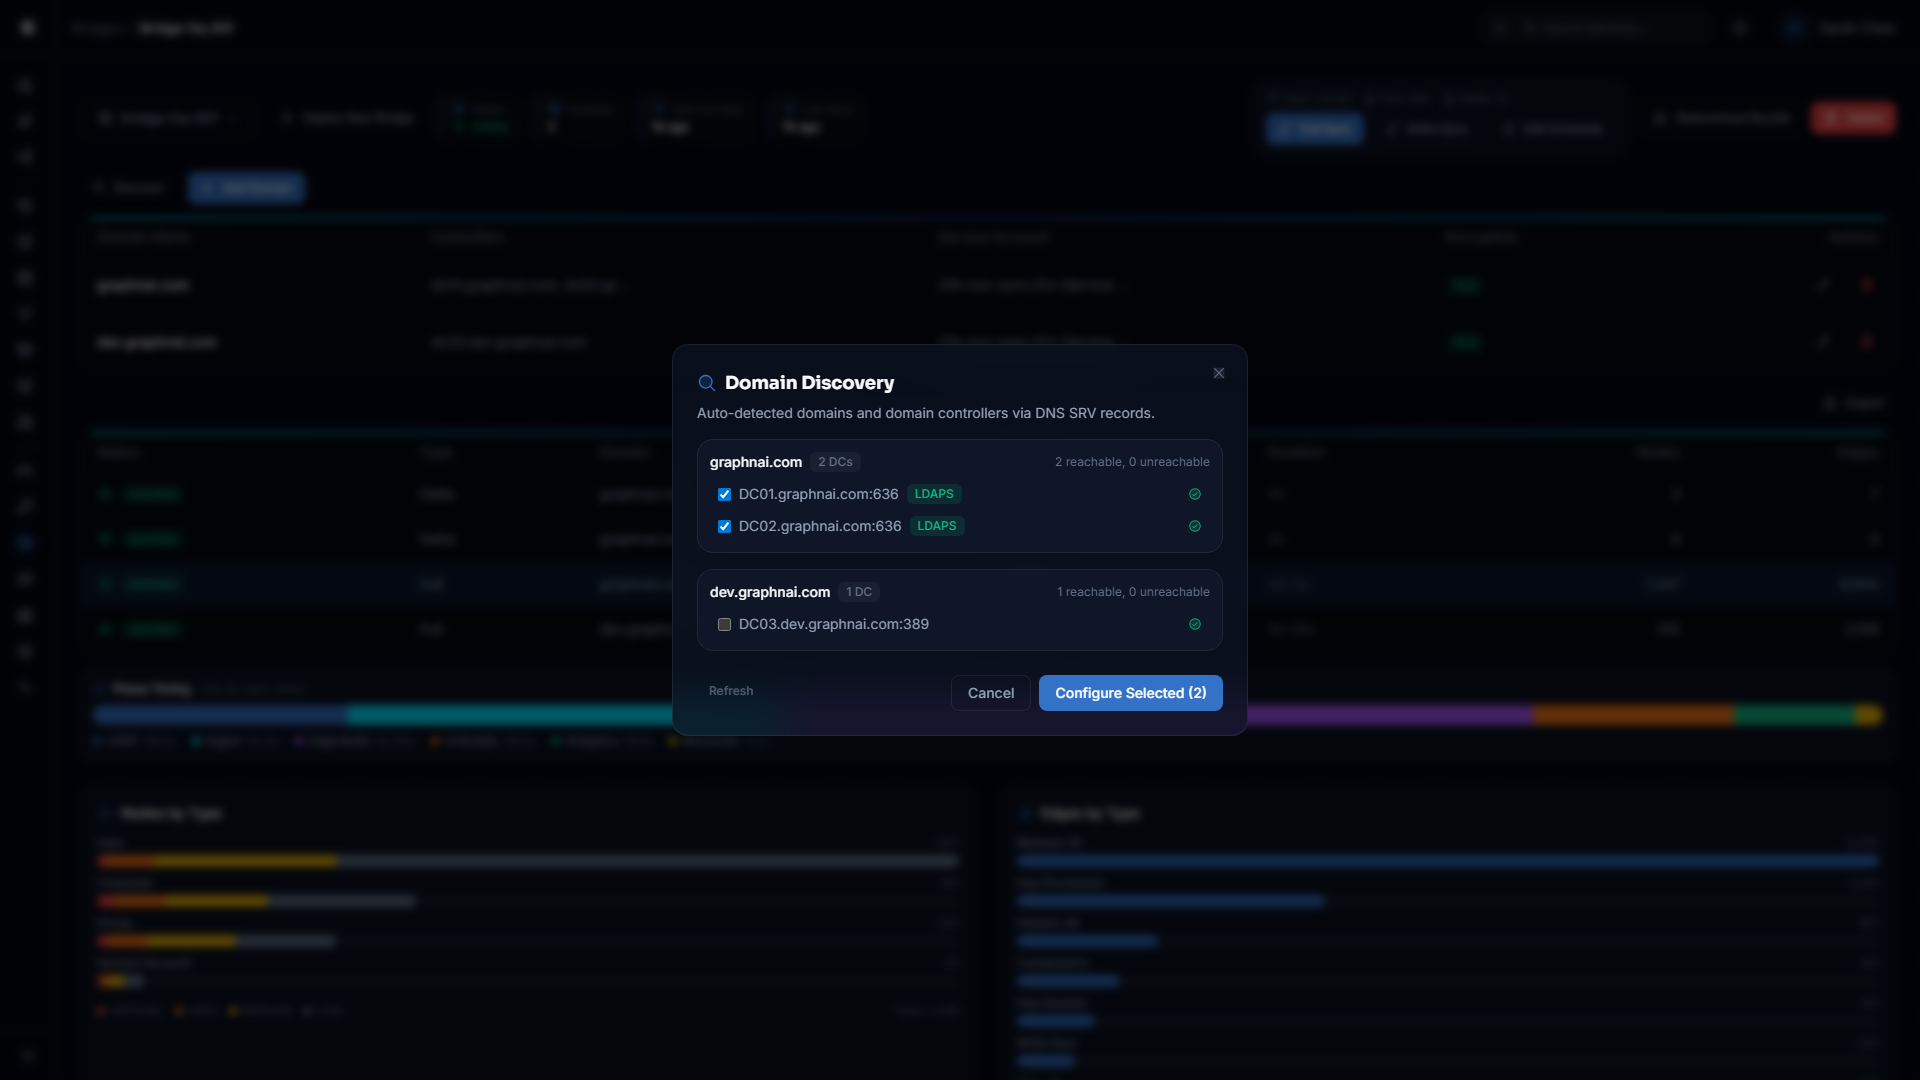
Auto-Discovery
If you click Save without adding any domains, the Bridge runs an automatic discovery scan of your network. It queries DNS for Active Directory domain controllers in all DNS search suffixes configured on the Bridge host and tests connectivity to any controllers it finds.
The results appear in the UI within a few seconds and can be used as a starting point for manual domain configuration.
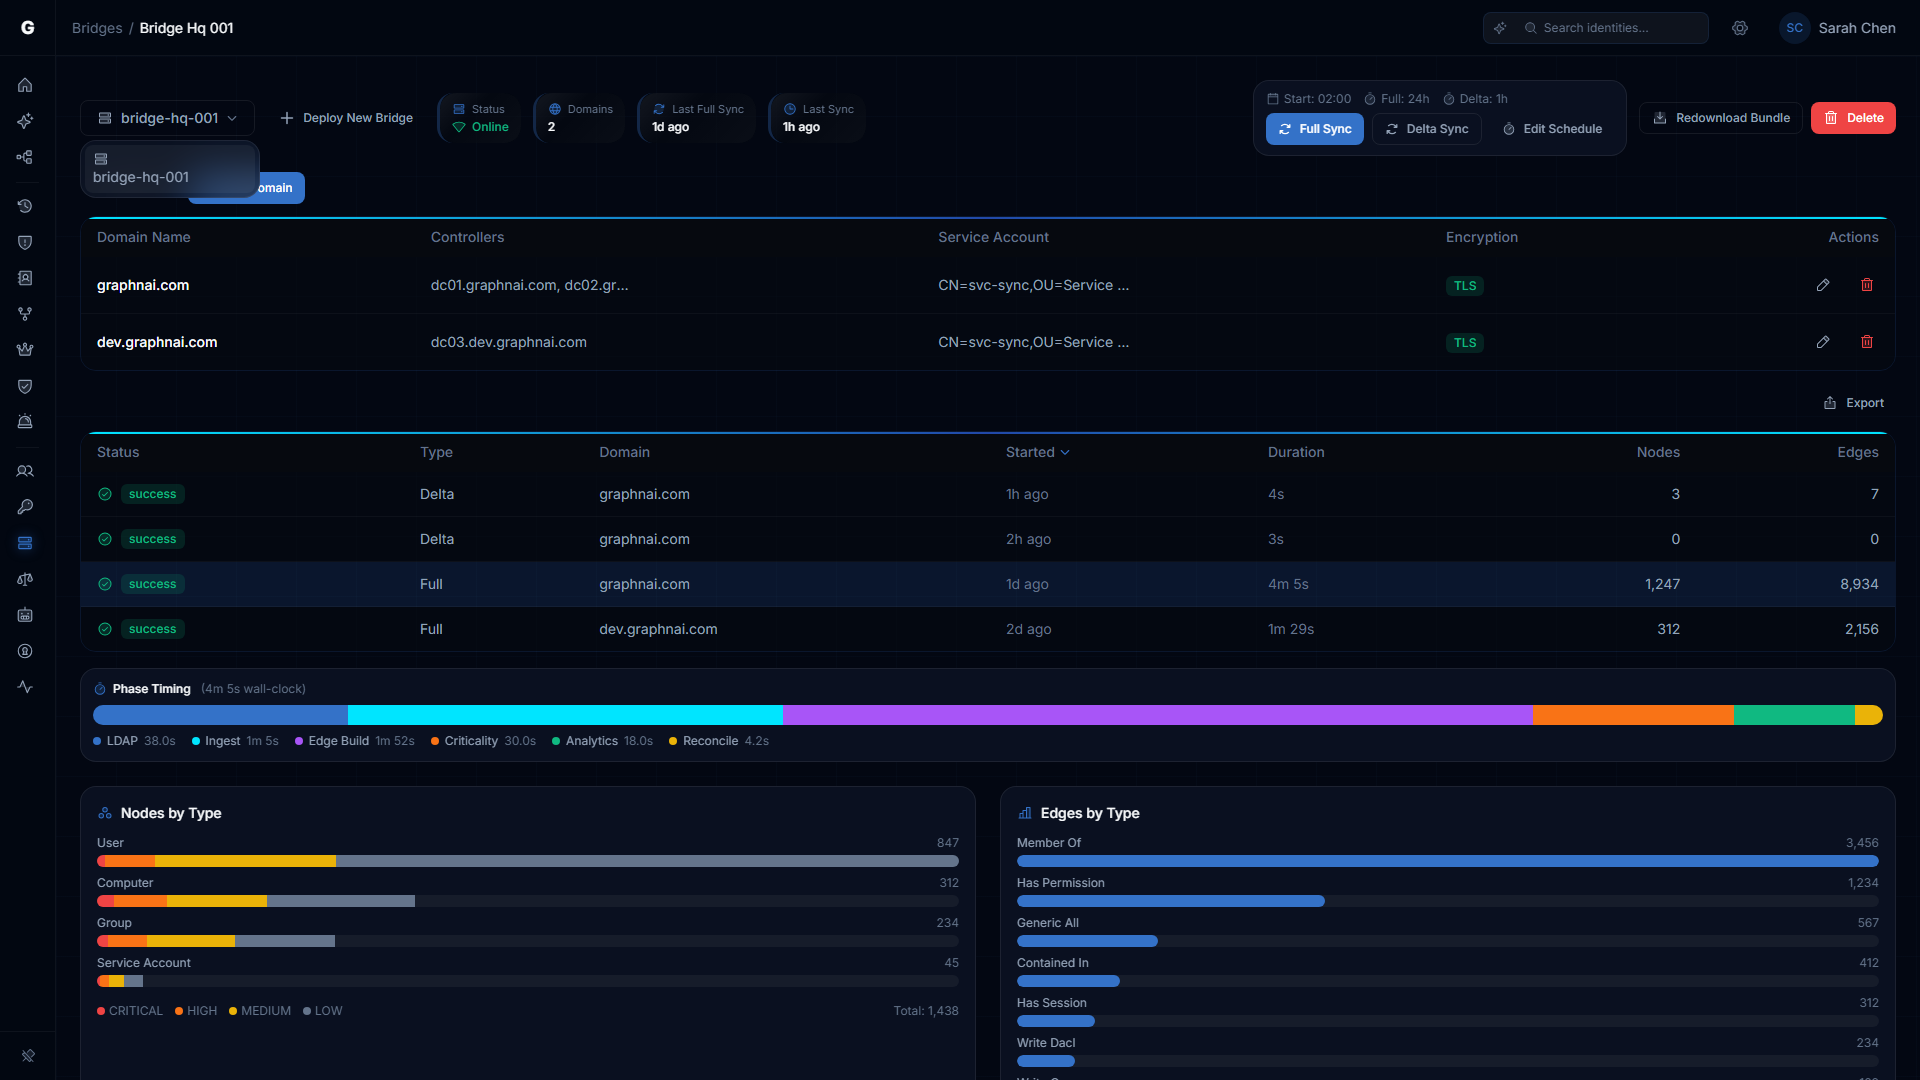
Multi-Domain Support
Add multiple domains by clicking Add Domain for each one. The Bridge maintains a separate LDAP connection pool per domain and syncs each domain independently. Each domain gets its own sync history, USN watermark, and policy collection state.
Domain names are matched by DNS suffix when routing remediation actions. For example, a request to disable CN=john.doe,DC=corp,DC=local is automatically routed to the corp.local domain's LDAP client.
Sync Behavior
Sync Types
The Bridge uses two sync modes that work together to keep the identity graph current.
Full sync collects all directory objects from scratch. It runs four queries in parallel — one each for users, groups, computers, and structural objects (OUs, containers, domains). Full sync is used for the initial collection and for periodic reconciliation.
Delta sync collects only objects that have changed since the last sync, using Active Directory's internal change tracking (USN numbers). Delta sync is much faster than full sync and runs on a configurable interval (default: every hour).
Sync Scheduling
Configure sync timing under the Bridge detail page sync schedule section:
| Setting | Default | Description |
|---|---|---|
| Sync Start Time | 00:00 | Time of day (24-hour, HH:MM) for the first sync after the Bridge starts. If the time has already passed today, the first sync runs immediately. |
| Delta Sync Interval | 1h | How often to run delta syncs after the initial sync. Minimum value is 1 minute. |
| Reconciliation Interval | 24h | How often to run a full reconciliation sweep to detect deleted objects. |
Reconciliation
When an object is deleted from Active Directory, a delta sync alone cannot detect the deletion (deleted objects are moved to the AD Deleted Objects container, outside the normal scope). The reconciliation sweep handles this.
During reconciliation, the Bridge fetches a complete list of active object IDs from Active Directory and sends it to the platform. The platform compares this list against its stored graph and marks any objects no longer in Active Directory as removed. Reconciliation only runs if at least one previous full sync has completed successfully.
On-Demand Sync
Operators and Admins can trigger a sync immediately from the UI:
- Navigate to the Bridge detail page
- Click Trigger Sync
- Choose Delta Sync (collect only changes) or Full Sync (collect everything)
- The sync runs in the background; the sync status updates in real time
To stop a running sync, click Stop Sync. The Bridge cancels the in-progress collection cleanly.
What the Bridge Collects
Identity Objects
The Bridge maps the following Active Directory object types to identity graph nodes:
| AD Object Class | Graph Type | Key Attributes Collected |
|---|---|---|
user (non-computer) | User | sAMAccountName, adminCount, servicePrincipalName, userAccountControl |
group | Group | sAMAccountName, memberOf |
computer | Computer | sAMAccountName, servicePrincipalName |
organizationalUnit | OU | name, distinguishedName |
container | Container | name, distinguishedName |
builtinDomain | BuiltinDomain | name |
domainDNS | Domain | name |
Relationships (Edges)
The Bridge builds the following relationships between objects:
| Relationship | Source | How It Is Determined |
|---|---|---|
| MemberOf | User, Group, Computer | The memberOf attribute on each object |
| MemberOf (primary group) | User | The primaryGroupID attribute combined with the domain SID |
| ContainedIn | Any object | The parent container extracted from the object's distinguished name |
| GPLink | OU, Container, Domain | The gPLink attribute on OU and container objects |
| OwnerOf | Any | The owner SID in the object's security descriptor |
Permission Edges (ACL Analysis)
The Bridge reads the Windows security descriptor from every directory object (nTSecurityDescriptor attribute) and produces permission edges showing who has what level of access over each object. The edge types produced are:
| Permission | What It Means |
|---|---|
| GenericAll | Full control over the object |
| GenericWrite | Can write any property on the object |
| WriteDacl | Can modify the object's permission list |
| WriteOwner | Can take ownership of the object |
| AllExtendedRights | All extended rights (includes ability to reset passwords, replicate directory changes) |
| ForceChangePassword | Can reset the user's password without knowing the current password |
| AddMember | Can add members to the group |
These edges are what the platform uses to detect toxic permission combinations and attack paths.
GPO Policy Data
The Bridge connects to the SYSVOL share on each Domain Controller using Kerberos authentication (with NTLMv2 fallback) and collects Group Policy Objects. For each GPO, it reads:
GptTmpl.inf (Security Settings): Extracts logon rights such as "Deny Logon Locally" (
SeDenyInteractiveLogonRight), "Deny Logon from Network" (SeDenyNetworkLogonRight), and "Deny Remote Logon" (SeDenyRemoteInteractiveLogonRight). These produce Constrained fidelity edges that restrict which identities can actually use certain access paths.Groups.xml (Group Policy Preferences / Restricted Groups): Extracts configured group memberships enforced by policy. These produce Constrained fidelity MemberOf edges that reflect the effective group membership state rather than the LDAP-only view.
GPO collection uses delta support — on incremental syncs, the Bridge skips GPO files that have not been modified since the last policy sync.
Read-Only Mode
When read-only mode is enabled, the Bridge operates in a safe, non-destructive mode:
- All directory collection (LDAP sync, GPO collection) runs normally
- Any remediation instruction received from the platform (disable user, remove member) is acknowledged as successful but no LDAP write operation is performed
- The platform logs the instruction as "Skipped (Read-Only Mode)"
This mode is useful for initial deployments where you want to validate data collection before enabling write capabilities, or in environments where the service account intentionally has no write permissions.
Sync History and Monitoring
To view the sync history for a Bridge:
- Navigate to the Bridge detail page Sync History section
- The table shows each sync run with:
- Start and end time
- Sync type (full or delta)
- Domain name
- Number of identities, resources, and edges collected
- Status (success, failed, in progress)

Troubleshooting
Bridge does not appear as Connected in the UI
Check container logs:
bash
docker compose logs -fPossible causes and fixes:
"FATAL: required environment variable ... is not set" — The configuration in
docker-compose.ymlwas not set. Verify the file was not modified after being extracted from the ZIP bundle."websocket dial: ..." — The Bridge cannot reach the platform server. Verify:
- The host can reach the server on port 8443:
nc -zv graphnai.example.com 8443 - The server URL value begins with
wss://(nothttps://) - No firewall rule is blocking outbound connections on port 8443
- The host can reach the server on port 8443:
"Failed to load mTLS KeyPair" — The
cert.pemorkey.pemfile is missing or has incorrect permissions. Verify the files exist and are readable by the container user."Failed to parse Root CA PEM" — The
ca.crtfile is empty or corrupt. Re-download the bridge bundle from the platform and replace the file.
Domain configuration fails with "validation failed"
When clicking Test Connection or Save, the Bridge tests a live connection to each Domain Controller before accepting the configuration. If validation fails:
- "AuthFailed" — The service account credentials are incorrect. Verify the username format (UPN
[email protected]or DNCN=user,...) and the password. - "Unreachable" — The Bridge cannot reach the Domain Controller. Verify the controller URL and that the Bridge host can reach the DC on port 636 (LDAPS) or 389 (LDAP).
- "dial tls: ..." — LDAPS is configured but the DC's certificate is not trusted. Use the Certificate Trust wizard (see Trusting Custom Enterprise CAs) to add the enterprise CA to the Bridge's trust store before saving.
The entire configuration update is rejected if any single domain fails validation. Fix all domain issues before saving.
Sync completes but no objects appear in the graph
Verify the sync actually ran: Check the Bridge detail page Sync History section to confirm the sync completed (not failed) and review the node/edge counts.
Check the Base DN: If the sync reports success but zero identities, the Base DN may point to an empty subtree. The Bridge auto-discovers the Base DN from Active Directory, but if auto-discovery fails it falls back to the configured domain name. Verify the domain name matches your actual AD domain.
Wait for graph processing: After a sync completes, the platform processes the ingested data asynchronously. Allow up to a minute after a large full sync before checking the graph topology view.
Stale data: changes in AD not reflected in graph
Delta sync picks up changes within the configured interval (default 1 hour). If you need immediate updates:
- Navigate to the Bridge detail page
- Click Trigger Sync > Delta Sync
If a user was deleted from AD but still appears in the graph, wait for the next reconciliation sweep (default 24 hours) or trigger a Full Sync to run reconciliation immediately.
SYSVOL / GPO collection fails
"domain config not found" in logs — The domain was not configured at the time the policy sync ran. Ensure the domain is configured and the first domain sync has completed before GPO collection is expected.
"smb ntlm session: ..." — SMB authentication failed. The Bridge tries Kerberos first, then NTLMv2. If both fail, verify the service account has access to the SYSVOL share on the Domain Controller.
"mount sysvol: ..." — The Bridge connected to the DC but could not mount the SYSVOL share. Verify SMB (port 445) is reachable from the Bridge host to the Domain Controller: nc -zv dc01.corp.local 445.
If your environment uses a custom Kerberos configuration, place a krb5.conf file in the Bridge's working directory (same directory as the binary, or the container's working directory /app). The Bridge loads it automatically before attempting authentication.
Access denied (403 Forbidden)
Cause: Your user account does not have the required role for the operation.
- Viewing bridge status and triggering syncs requires Operator role
- Provisioning bridges, saving configuration, and managing certificates requires Admin role
Solution: Contact an Admin to grant the appropriate role via Admin > User Management in the sidebar.
Best Practices
Deploy one Bridge per network segment. If you have isolated network segments (e.g., DMZ, OT network), deploy a separate Bridge in each segment rather than punching firewall holes between segments.
Use read-only mode initially. Enable read-only mode for the first week of deployment to validate data collection before enabling remediation.
Use LDAPS (port 636) always. Unencrypted LDAP (port 389) transmits credentials and directory data in plaintext. The insecure LDAP option exists only for isolated lab environments with no network exposure.
Protect
key.pemwith file system permissions. The private key is the Bridge's identity credential. On Linux, restrict it:chmod 600 key.pem.Mount
state.jsonon a persistent volume. Without state persistence, every container restart triggers a full sync instead of a delta sync, which increases load on your Domain Controllers.Set delta sync interval based on your change velocity. In environments with frequent provisioning changes, reduce the interval to 15 minutes. In stable environments, the default 1 hour is appropriate. Never set it below 1 minute.
Review sync history weekly. Consistent failures in the sync history indicate a connectivity or credential issue that should be addressed before the data in the graph becomes stale.