Quick Start: Self-Hosted Deployment
Deploy GraphnAI Platform in your environment in under 10 minutes. Unzip, start the stack, follow the wizard.
Audience: IT administrators deploying GraphnAI from a deployment bundle provided by your GraphnAI account representative.
Related: Hardware Sizing, Bridge Configuration, Domain Auto-Discovery, User Management & RBAC
What You Receive
Your GraphnAI account representative provides two items:
| Item | Description |
|---|---|
| Deployment bundle | An AES-256 encrypted zip file (graphnai-<name>-<version>.zip) containing a pre-configured docker-compose.yml, secrets, and a README |
| Zip password | A one-time password to extract the bundle |
The bundle contains everything needed to start the platform. All environment variables, secrets, and database passwords are pre-generated — no manual editing required.
Prerequisites
- Hardware — see the Hardware Sizing Guide for RAM, CPU, and storage requirements based on the number of identities in your environment
- Docker Engine 24+ and Docker Compose v2+ installed on the host machine
- GitHub Container Registry access — a GitHub Personal Access Token (PAT) with
read:packagesscope, provided by your GraphnAI representative - Network access from the host to
ghcr.io(to pull Docker images) and tologin.microsoftonline.com(for the Entra ID setup wizard) - A Microsoft Entra ID tenant where you have Global Administrator or Application Administrator rights (for the one-time setup wizard)
Step 1: Extract the Bundle
Extract the deployment bundle using the zip password you received:
bash
# On Linux/macOS (with p7zip or unzip supporting AES)
7z x graphnai-<name>-<version>.zip -p<ZIP_PASSWORD>

# On Windows
# Right-click the zip file > Extract All, then enter the password when prompted
After extraction you should see:
docker-compose.yml       # Pre-configured stack definition
README.md                # Deployment-specific instructions
secrets/
  arango_pass.txt        # Auto-generated database password
Step 2: Authenticate with GitHub Container Registry
Log in to GHCR to pull the GraphnAI server image:
bash
docker login ghcr.io -u <YOUR_GITHUB_USER> -p <YOUR_GITHUB_PAT>Your GitHub username and PAT are provided by your GraphnAI account representative.
Step 3: Start the Stack
bash
docker compose up -dThis starts two containers:
| Container | Purpose | Ports |
|---|---|---|
| server | GraphnAI Platform (API + UI) | 443 (HTTPS), 8443 (Bridge mTLS) |
| arangodb | Graph database | Internal only |
The server generates a self-signed TLS certificate on first boot. To use a CA-issued certificate, see TLS Configuration below.
Wait for the server to become healthy (typically 15-30 seconds):
bash
docker compose logs -f serverLook for the log line: "Starting HTTPS API Server".
Step 4: Complete the Setup Wizard
Open https://<your-server-fqdn> in your browser. Since no identity provider is configured yet, you are automatically redirected to the Setup Wizard.
NOTE
If you see a browser certificate warning, this is expected when using the auto-generated self-signed certificate. Accept the warning to proceed. For production, configure a CA-issued certificate (see TLS Configuration).
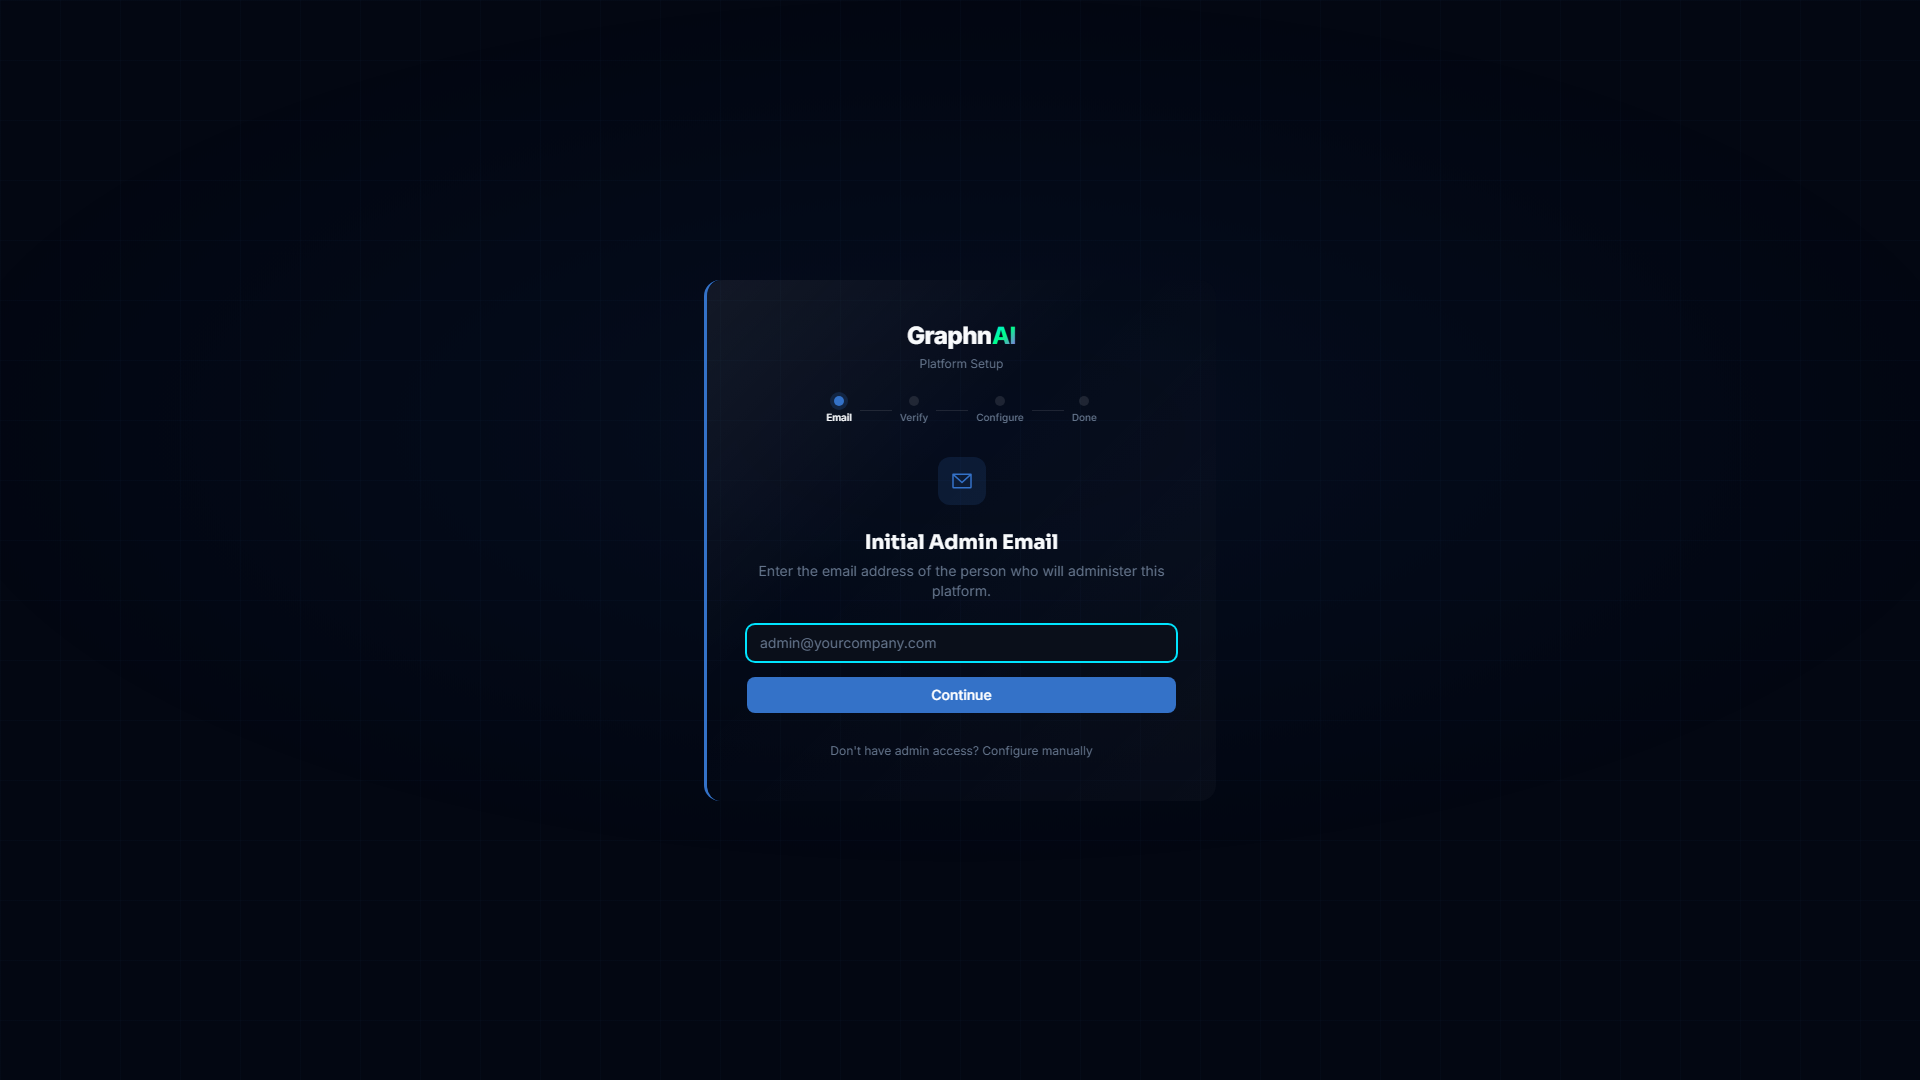
4a. Enter Your Admin Email
The wizard prompts for the Initial Admin Email. Enter the email address that matches the admin email on file with GraphnAI (the GRAPHNAI_SEED_ADMIN_EMAIL in your bundle's docker-compose.yml).
This is a security gate — only the designated admin can complete setup.
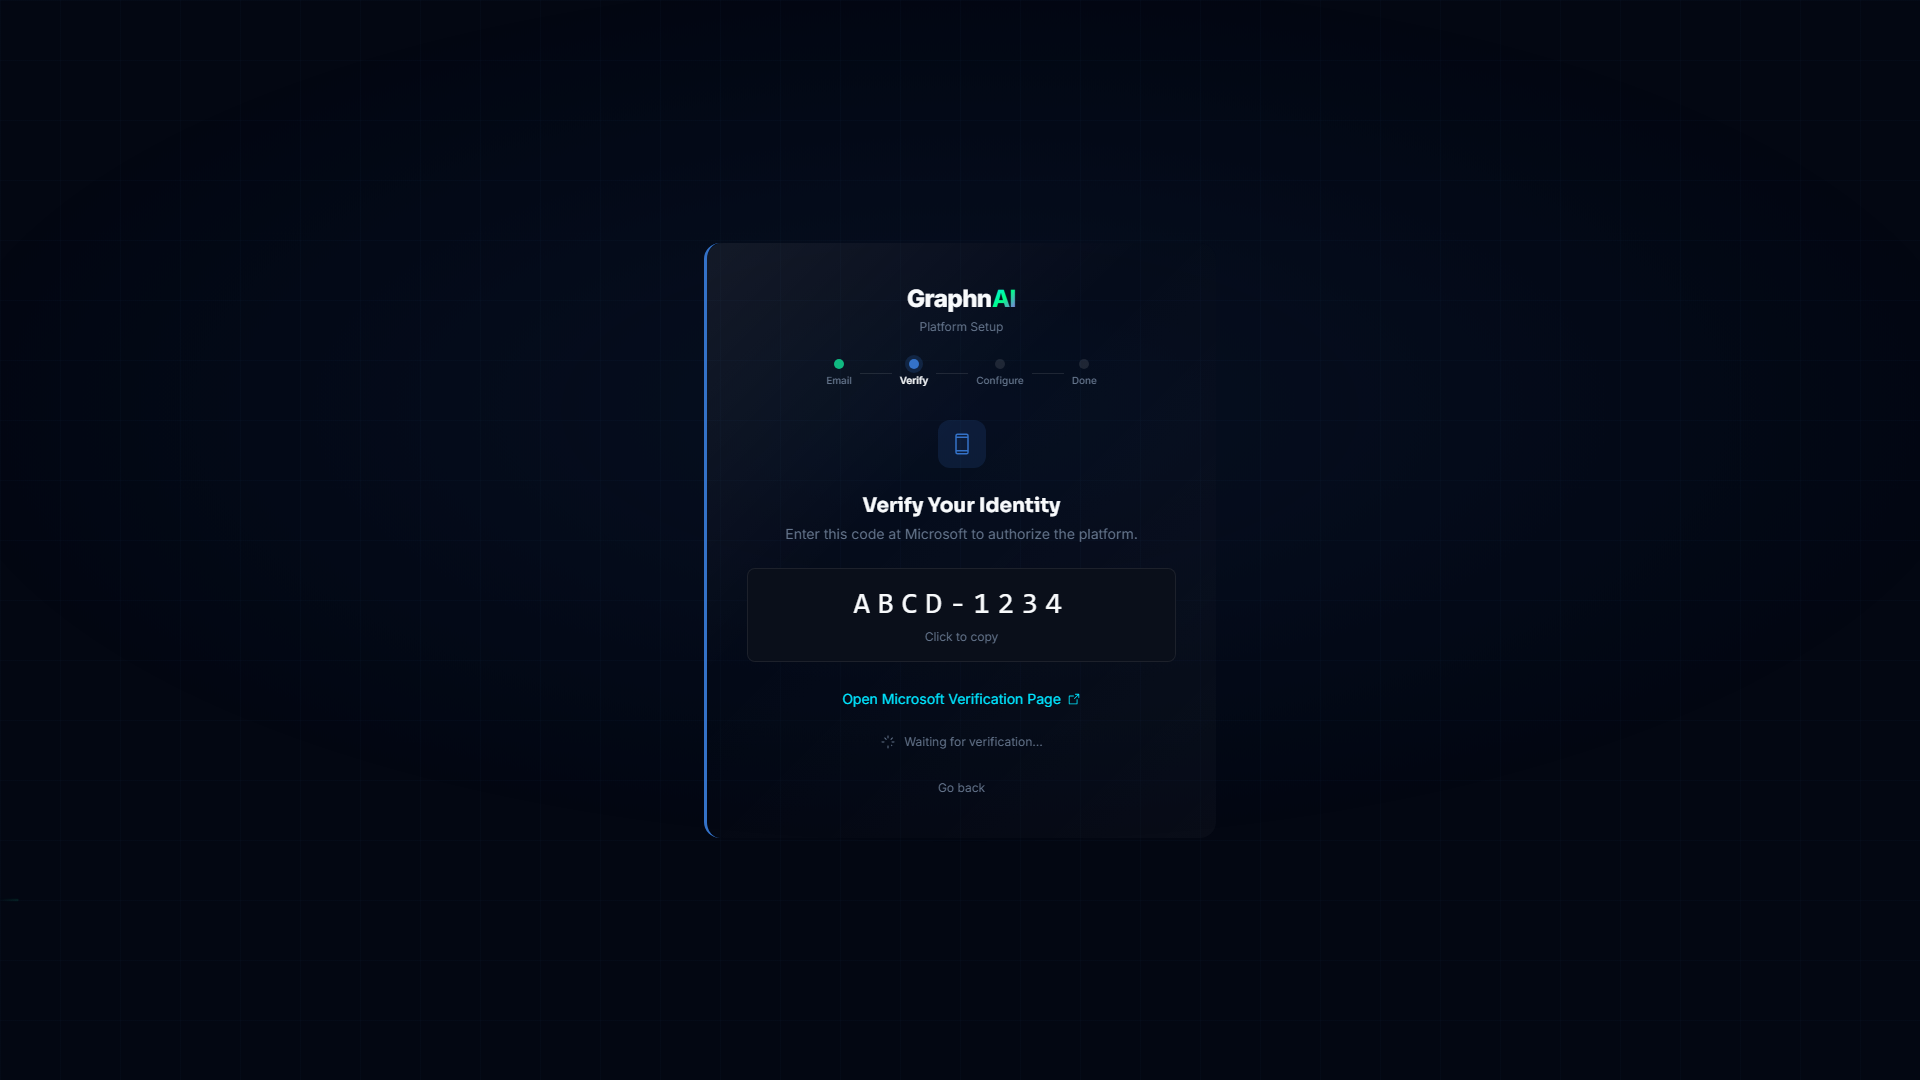
4b. Authenticate with Microsoft
The wizard displays a Device Code (e.g., ABCD-1234) and a link to microsoft.com/devicelogin.
- Click the link (or open it in a new tab)
- Enter the device code
- Sign in with your Microsoft Entra ID account
- Accept the GraphnAI Setup permission request if prompted
4c. Automated Provisioning
After authentication, the wizard automatically:
- Creates an App Registration in your Entra ID tenant
- Generates and uploads a client certificate for secure authentication
- Configures the redirect URI for your server's domain
- Saves the OIDC configuration to the database
- Hot-reloads the authentication service (no restart needed)
4d. Grant Admin Consent (if required)
Some Entra ID tenants require manual admin consent for application permissions. If prompted:
- Log into the Azure Portal
- Navigate to Enterprise Applications > GraphnAI Platform > Permissions
- Click Grant admin consent for [your tenant]
TIP
If you skip this step, GraphnAI will detect missing permissions when you first try to search the directory and display a banner with instructions.
4e. Sign In
After setup completes, you are redirected to the login page. Click Sign in with Microsoft and authenticate. Your account is automatically registered as the first Admin.
Step 5: Connect an Identity Bridge (Optional)
The Identity Bridge agent collects Active Directory data from your on-premises environment. If your organization uses on-premises Active Directory, deploying a Bridge enables GraphnAI to analyze your full identity landscape.
Generating a Bridge Configuration
- Navigate to Bridges in the sidebar
- Click Add Bridge or Generate Config
- Download the bridge configuration bundle to your on-premises VM
- Start the bridge agent using the downloaded configuration
Once the bridge connects, it automatically discovers Active Directory domains on its network using DNS. See Domain Auto-Discovery for details on how discovery works and how to configure discovered domains.
Configuring Domains
After the bridge connects and discovery completes:
- A banner appears in the Bridge detail page showing discovered domains
- Click View to see the discovery results
- Select the domains and domain controllers you want to sync
- Enter service account credentials for each domain
- Click Configure Selected to save
For detailed instructions on domain configuration, sync scheduling, certificate management, and troubleshooting, see the Bridge Configuration Guide.
Hybrid Entra Environments
If your Entra ID tenant syncs with on-premises Active Directory (via Entra Connect), GraphnAI automatically detects on-premises domains after the first Entra sync. A prompt appears listing the discovered domains with user counts, guiding you to deploy a Bridge for those domains. See Domain Auto-Discovery > Entra Hybrid Detection for details.
TLS Configuration
By default, GraphnAI generates a self-signed certificate for HTTPS. For production deployments, mount a CA-issued certificate:
Place your certificate and key files in a
certs/directory alongside thedocker-compose.yml:certs/ server.crt # Your CA-issued certificate (PEM format) server.key # Corresponding private keyUncomment the TLS lines in
docker-compose.yml:yamlenvironment: TLS_CERT_FILE: "/app/certs/server.crt" TLS_KEY_FILE: "/app/certs/server.key" volumes: - ./certs:/app/certs:roRestart the server:
bashdocker compose restart server
Upgrading
To upgrade to a new version of GraphnAI:
- Update the image tag in
docker-compose.yml(e.g.,v1.0.0tov1.1.0) - Pull the new image and recreate the container:bash
docker compose pull server
docker compose up -d server
Your data (ArangoDB) and configuration (OIDC provider settings) persist across upgrades via Docker volumes.
Architecture Overview

- Port 443 — Platform UI and REST API (HTTPS)
- Port 8443 — Secure mTLS listener for Identity Bridge connections
- Bridges run on-premises and connect outbound to port 8443. They are managed entirely from the platform UI.
Troubleshooting
Cannot pull Docker images
Verify your GHCR credentials:
bash
docker login ghcr.io -u <YOUR_GITHUB_USER> -p <YOUR_GITHUB_PAT>
docker pull ghcr.io/graphnai-security/server:latest
If authentication fails, contact your GraphnAI representative for updated credentials.
Server fails to start — "License validation failed"
The license key in the bundle may have expired. Contact your GraphnAI account representative for a renewed license.
Setup Wizard does not appear
The wizard only runs when no OIDC provider is configured. If you previously completed setup, the server goes directly to the login page. This is expected behavior.
"Invalid admin email" in the Setup Wizard
The email you entered does not match the GRAPHNAI_SEED_ADMIN_EMAIL configured in the bundle. Check the docker-compose.yml to see which email was configured, or contact your GraphnAI representative.
Browser shows certificate warning
This is expected when using the auto-generated self-signed certificate. For production, configure a CA-issued certificate as described in TLS Configuration.
Database connection errors in server logs
The server waits for ArangoDB to become healthy before starting. If you see repeated connection errors, check that the arangodb container is running:
bash
docker compose ps
docker compose logs arangodb
Next Steps
After completing the initial setup:
- Add users — Navigate to Admin > User Management in the sidebar to invite additional users and assign roles (Viewer, Operator, Admin). See User Management & RBAC.
- Deploy a Bridge — Connect your on-premises Active Directory to start collecting identity data. See Bridge Configuration.
- Explore the graph — Once identity data is synced, use the Graph Explorer to visualize access relationships and identify security risks.
Support
Contact your GraphnAI account representative for assistance.